Destiny 2 Star Crossed Mission: How to Complete the Mission [Detailed Guide]

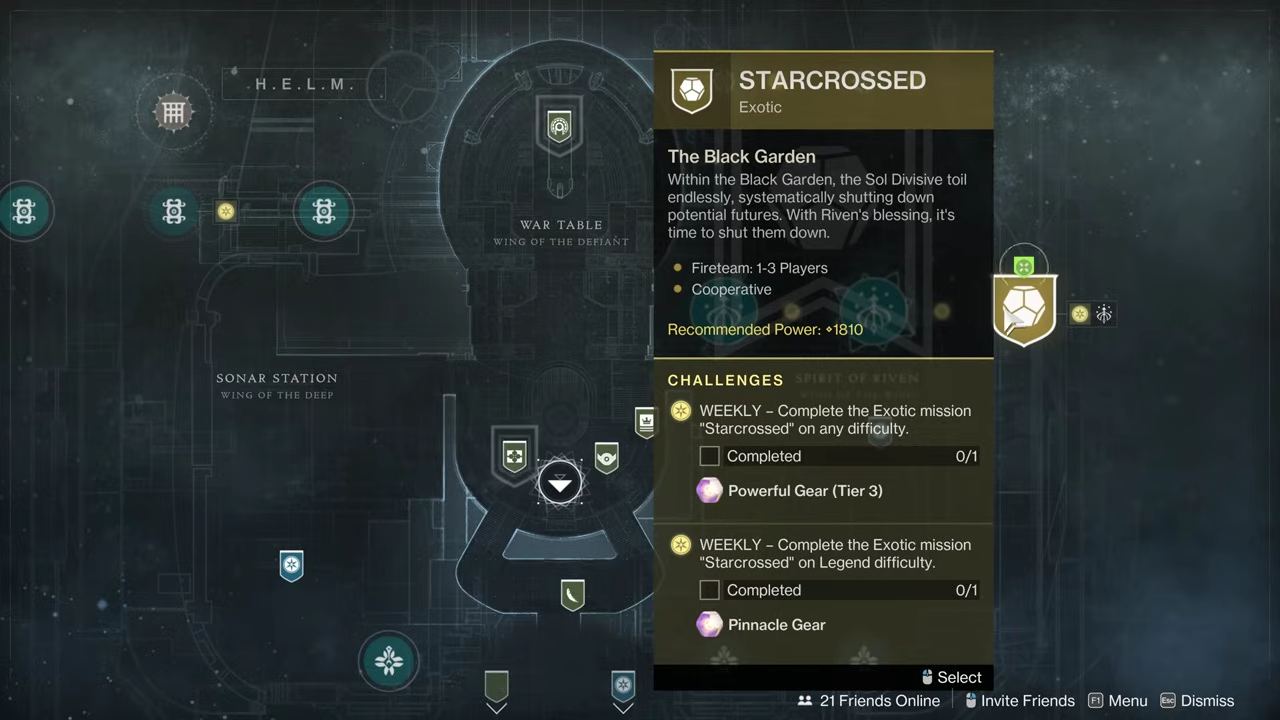
Destiny 2 has several missions that can be quite hard to complete and Stra crossed mission is one of them. You can complete the Starcrossed mission by going to Step 29 within the Wishing All the Best seasonal quest. The HELM will then generate the Exotic mission node next to The Coil seasonal activity. It’s important to note that Starcrossed is designed for three players and doesn’t support matchmaking.
Read More About: How To Get (& Catch) Meloetta (Pokemon Scarlet & Violet Indigo Disk DLC)
Destiny 2 star crossed mission
When players have defeated the Akardon, they should just go and finish the exotic mission. Go through the newly opened gap in the Vex wall to discover Riven’s elusive egg and a chest with your coveted new Wish-Keeper bow. in Destiny 2 star crossed mission.
Open the Way: First Encounter
The mission thrusts you into the mysterious Black Garden, where navigating the colossal tree branches and leaves leads you to the opening encounter in Destiny 2 star crossed mission. Prior to the initial encounter, you’ll encounter a handful of Taken enemies and receive a brief introduction to the mission mechanic. Look out for a luminous “spark” that emits light, making it easily visible from a distance.
When you Step on the spark, it grants a buff named Sire’s Obligation from Riven, and it lasts for approximately 45 seconds. During this timeframe, your task is to engage the Taken Obdurate Phalanx adorned with a similar glowing aura. Yet, there’s an additional layer to the challenge – each Obdurate Phalanx corresponds to a symbol found on the Last Wish raid’s Wish Wall. Successfully defeating them is the key to unlocking the path ahead.
In the rear section of the initial encounter area, there’s a sealed barrier that necessitates the defeat of three Obdurate Phalanx bosses. Obtain the Sire’s Obligation buff either at the front of the entrance or on the moss-covered arch in the center. Utilizing Sire’s Obligation, identify the symbols that need unlocking, starting from the top and working your way down to the third symbol in Destiny 2 star crossed mission.
Place yourself to face the front right for one Obdurate Phalanx, the middle bottom for another, and the top corner near the locked pathway for the third. Begin by targeting the Obdurate Phalanx associated with the top symbol on the lock. Keep in mind that defeating an Obdurate Phalanx summons two Cyclops that can deal significant damage, so prioritize eliminating them. For taking down the bosses, grenades and close-range heavy weapons are effective, although rocket launchers and linear fusion rifles can be obstructed by Phalanx shields. Don’t forget to deploy your Supers to expedite the damage for smoother progress.
Access the Transit Mechanism: Second Encounter
In Starcrossed, a new spark mechanic emerges before the second encounter, offering an orange-colored spark that bestows the Dam’s Gift buff. Navigate through the orange aura jumping puzzle within the specified time limit. Much like the poison or underwater areas in Destiny 2, the orange aura gradually diminishes your health, but Dam’s Gift protects for 45 seconds.
When you reach the Roost area, another Dam’s Gift spark awaits at the center. With the buff active, choose between the left, middle, or right orange aura rooms. Clearing additional enemies and maximizing boss DPS is crucial in this segment, as you’ll be facing Gatekeeper Wyvern bosses alongside swarms of minor foes in Destiny 2 star crossed mission. Opt for rocket launchers, grenades, and potent Supers to swiftly damage the boss, with the Well of Radiance serving as a protective option. You must look at the three rooms and clear all of them:
- Room on Right: The entire combat phase hinges on having the Dam’s Gift buff. Start by defeating the Gatekeeper Wyvern boss, then head to the Vex node situated on the rock with a red glowing diamond above it and infuse it with paracausal energy.
- Room on Left: Retrieve the Dam’s Gift and take down the Minotaurs and any intervening enemies. The left room follows a linear path, and you may need to navigate in and out of the orange aura areas. Once the Wyvern is defeated, empower the Vex node marked by the red diamond, just after crossing the orange aura zone in Destiny 2 star crossed mission.
- Room in the Middle: The Dam’s Gift isn’t mandatory for combat, but you’ll require it to reach the Wyvern. Exercise caution, as enemies may encircle you in the confined space while the Wyvern attacks from the front platform. The large rock near the entrance serves as cover when engaging the Wyvern. Once the Wyvern is vanquished, empower the Vex node located on the platform.
Deactivating the Barrier: Third Encounter
You will spot a door to your left side when you reach the platform that contains wish wall symbols. To reach the boss fight, you’ll need to incorporate mechanics from both the first and second encounters. Begin by using the Sire’s Obligation buff in front of the locked door; determine the symbol you need to address first. Next, employ the Dam’s Gift, obtained near where the Taken enemies spawn, to access the orange aura rooms. Acquiring both buffs grants you the Crowned by Dragons buff, active for 45 seconds in Destiny 2 star crossed mission.
To distinguish between the buffs, note the following visual clues in Destiny 2 star crossed mission:
- Sire’s Obligation: Characterized by floating flower petals and rocks surrounding the spark pool.
- Dam’s Gift: Identified by dark spots floating and the base of the spark pool covered in poppy-like flowers.
The Obdurate Phalanx bosses are positioned in the left and right rooms, with one exposed near the Dam’s Gift spark. Deactivate the barrier to progress.
How to finish the Destiny 2 star crossed mission
You can enter the boss room and confront Akardon, the Pitiless Mind Hydra by equiping both the Dam’s Gift and Sire’s Obligation to activate the Crowned by Dragons buff. When engaging the boss, consider using ranged Supers such as Nova Bomb or Golden Gun, and opt for rocket launchers and linear fusion rifles for effective long-range damage without the need to approach closely. You can be prepared for the boss room, which not only spawns additional enemies but also releases small Vex bugs to impede your progress in Destiny 2 Star Crossed mission.
Inside the boss room, you can replenish your buffs; Sire’s Obligation is on the left, and Dam’s Gift is on the right. Keep in mind that defeating the yellow-bar Pitiless Attendants is necessary to access these buffs comfortably. Alternatively, grabbing the buffs from the entrance can help you regain your footing and offer temporary cover.
Read Next: How To Get Gouging Fire Pokemon | Location And How To Catch
Hi, I’m Matthew Wilkins, a dedicated gamer and seasoned journalist holding a Communicative English degree from Chapman University. With over 8 years of hands-on gaming experience, I bring a wealth of knowledge to GAMINGFLAWS. Throughout my career, I’ve been a trusted guide for many, navigating the ever-evolving landscape of the gaming world. Follow me for more expert insights into the gaming universe.

![How To Get The Proboscis Cernos In Warframe [Complete Guide]](https://ciceropost.com/wp-content/uploads/Warframe-768x432.jpg)

![How to Collect Essence Of Aether Sample Locations in MW3 Zombies [Complete Guide]](https://ciceropost.com/wp-content/uploads/Essence-of-Aether-Mission-768x432.jpg)
![Penguin In Palworld: The Best Penguin Revealed [Comprehensive Guide]](https://ciceropost.com/wp-content/uploads/penguin-in-palworld-768x432.jpg)